
By: VaibhaV Nanoti
Nginx (pronounced “EngineX”), is a free, open-source, high-performance HTTP server and reverse proxy, as well as an IMAP/POP3 proxy server. We use this as a reverse proxy server to host a site or multiple sites proxying cache server.
We can find more details and download the RPM from http://wiki.nginx.org/Install and use nginx-release-rhel-6-0.el6.ngx.noarch.rpm for RHEL 6.3 X86_64.
So before going for installation and configuration , the concept of reverse proxy server is elaborated by following diagram:
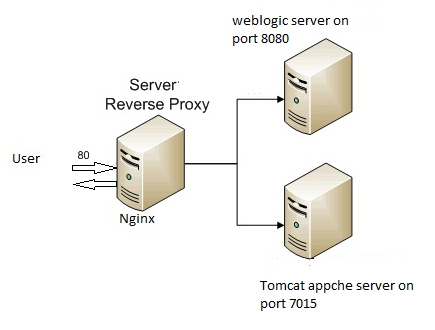
Installation and Configuration: We can use the same application server box or any other box to install the nginX . In this case we used the same application server box where the Weblogic server is installed on port 7001 and managed server on port 8080.
Now install the RPM
# rpm –ivh nginx-release-rhel-6-0.el6.ngx.noarch.rpm
And update the /etc/nginx/nginx.conf as shown in BOLD:
Ø  Worker_processer: Decent starting point for this is the number of cores/threads on the box.
Ø  Worker_Connection: 1024 is a decent starting point but You can increase it further as per hits .
user nginx;
worker_processes 2;
error_log /var/log/nginx/error.log warn;
pid /var/run/nginx.pid;
events {
worker_connections 1024;
}
http {
include /etc/nginx/mime.types;
default_type application/octet-stream;
log_format main ‘$remote_addr – $remote_user [$time_local] “$request” ‘
‘$status $body_bytes_sent “$http_referer” ‘
‘”$http_user_agent” “$http_x_forwarded_for”‘;
access_log /var/log/nginx/access.log main;
sendfile on;
#tcp_nopush on;
keepalive_timeout 65;
gzip on;
include /etc/nginx/conf.d/*.conf;
}
Also create the proxy. conf at same location as follows:
proxy_redirect off;
proxy_set_header Host $host;
proxy_set_header X-Real-IP $remote_addr;
proxy_set_header X-Forwarded-For $proxy_add_x_forwarded_for;
client_max_body_size 10m;
client_body_buffer_size 128k;
proxy_connect_timeout 90;
proxy_send_timeout 90;
proxy_read_timeout 90s;
proxy_buffers 32 4k;
Now go to /etc/nginx/conf.d
And update default.conf with below references .( Just take a backup of default. conf before updating).
## Basic reverse proxy server ##
## Weblogic (vm-DEV-12ENT) backend for enterprise12.dev.sun.net ##
server {
listen 10.10.10.100:80;
server_name enterprise12.dev.sun.net;
access_log /var/log/nginx/xamin.access.log main;
error_log /var/log/nginx/xamin_error.log debug;
location /Apollo
{
include proxy.conf;
proxy_pass http://10.10.10.100:8080;
}
}
server {
listen 10.10.10.100:80;
server_name vm-dev-12-cx.sun.net;
access_log /var/log/nginx/coex.access.log;
error_log /var/log/nginx/coex_error.log debug;
location /Performance {
include proxy.conf;
proxy_pass http://10.10.10.101:7015;
}
}
server {
listen 10.10.10.100:7015;
server_name vm-dev-12-cx.sun.net;
access_log /var/log/nginx/coex.access.log;
error_log /var/log/nginx/coex_error.log debug;
location /Performance {
include proxy.conf;
proxy_pass http://10.10.10.101:7015;
}
}
And at last start the nginx server
# service nginx start
# chkconfig nginx on
# service nginx restart
We implemented the solution for some customers ; who is not using load balancer and to improve the performance of the product.
